Once you've pulled your timecard data from your POS system in Excel or CSV format, please send the raw file to your Client Success Specialist. They will review the conents and assist you with the proper formatting needed.
- Here are a few of the required pieces of data that must be included on your timecard file in order for it to be imported into isolved:
- Key - This can be either the employee number or social security number. (isolved does not use employee names as an identifier on import files.) It is imperative that this matches exactly what is in isolved. If you are not able to pull SSNs from you POS system, and you currently have different employee IDs setup from how they are in isolved, your Client Success Specialist can help you with the steps needed to make the information match properly.
- Earning Type – Depending on what types of earnings should be paid (for example, "Regular," "Overtime," "Tipped Wages," "Bonus," etc.) the file must specify the type of hours that are listed for each employee.
- Rate of pay - If the employee's hourly rate is being managed within your POS system (and not isolved), it will be important that your timecard file include the appropriate rate of pay for each hours type included. If hourly rates are being managed within isolved, this information may not be needed on the import file.
- Labor values - If your company is using Labor values for labor allocation (such as Department, Location, etc.), these values will need to be included on your import file if an employee has worked hours in a labor value other than his/her default setting in isolved.
Once your timecard import file has been properly formatted, the steps to complete the import process are simple. Here are the step-by-step instructions for how to import your timecard file as part of your payroll preparation:
- Navigate to PAYROLL PROCESSING > Payroll Entry > Timecard Import.
- Select the Import Type of "Timecard."
- Click the three dots to Attach your File. This will automatically detect and populate the correct File Format.
- Under Import Options, verify that the Default Company, Default Pay Group, Pay Date, Period Begin Date and Period End Date are correct.
- The Import Key field should be set to the type of data that is listed on your file under the "Key" heading (either Employee Number or Social Security Number.)
- Click Next in the black action bar.
NOTE: If you have more than one pay group, you will need to complete a separate import for each pay group.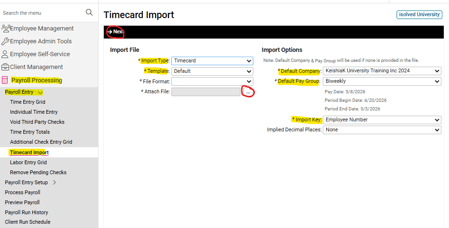
- Once you’ve imported your file, the Import Validation Summary at the bottom of the screen will show any errors that may need to be corrected before the file can be imported.
Warning Records will allow you to proceed with the import but should be reviewed before doing so in order to ensure that all data listed is correct.
Critical Error Records and File Format Errors must be fixed in order to import the file. Click Previous in the black bar, go to your original import file and make any required changes, then Save, and begin the import process again.
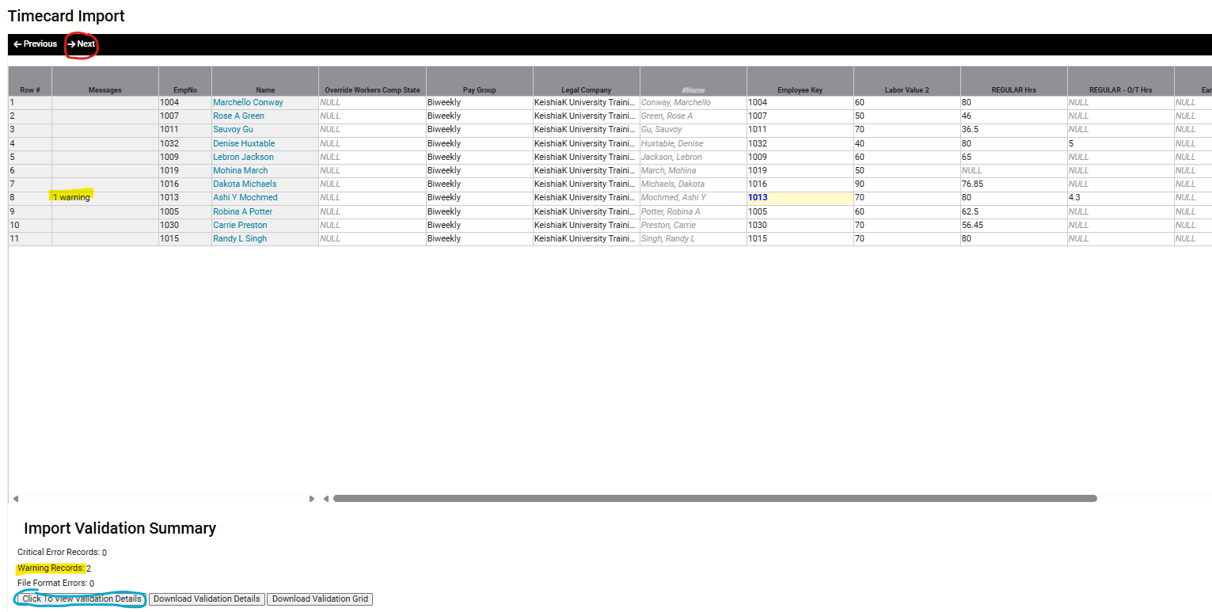
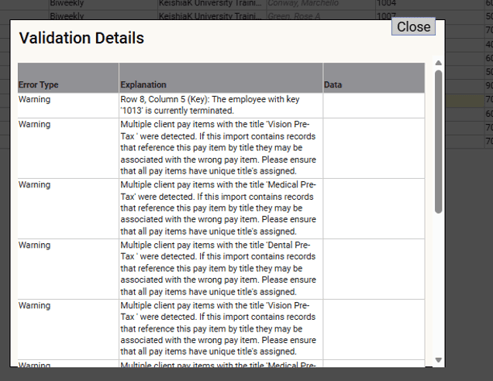
8. Click the Click to View Validation Details button to display a list of all error records noted in the Import Validation Summary section.
NOTE: Salaried employees should not be included on your Timecard import file, as isolved will automatically apply their normal hours and per pay salary. If hours are included on the Timecard import for a salaried employee, those hours will override their Normal Hours and adjust their pay accordingly.
9. Once all errors have been addressed and corrected, click Next in the black bar to import the data onto your Time Entry Grid. Additional earnings, if needed, can be added to the Time Entry Grid after importing.
10. Once all information has been entered onto the Time Entry Grid, go to PAYROLL PROCESSING > Process Payroll to preview process your payroll as normal.
 What Else Should I Know?
- If you realize an error while previewing your payroll, corrections can be done directly on the Time Entry Grid. However, if there are several errors, please reach out to your Client Success Specialist to have the import removed to allow for corrections and reimporting.