Here are step-by-step instructions for posting documents (such as an updated Employee Handbook) in employees' Self-Service accounts using the employee message functionality:
CREATING THE MESSAGE CATEGORY
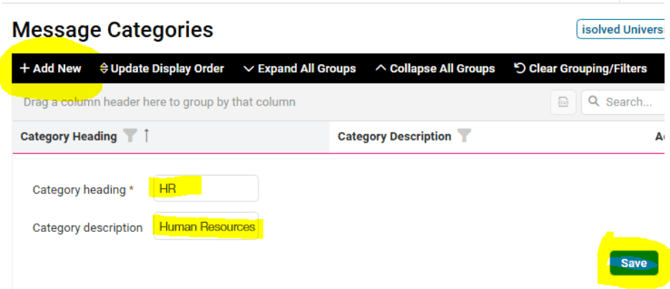
NOTE: A "Message Category" is a required field when creating Employee Messages. Please use Step 1 below to see if an "HR" Message Category already exists. If so, you can skip the remainder of this section and jump straight to the following "Creating the Employee Message" section.
-
Go to CLIENT MANAGEMENT > HR Management > HR Administration > Message Categories.
-
Click Add New in the black bar.
- Category Heading - Type HR.
- Category Description - Type Human Resources.
- Click Save in the black bar.
CREATING THE EMPLOYEE MESSAGE WITH ATTACHED DOCUMENT
-
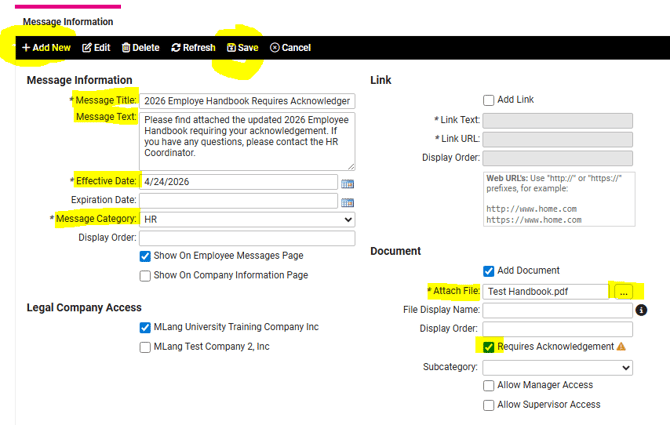
Go to CLIENT MANAGEMENT > HR Management > HR Administration > Employee Messages.
-
Click Add New in the black bar.
-
Message Title - Enter the subject line of the message.
-
Message Text - Enter the body of the message.
- Effective Date - Enter the date you want the message to post in Employee Self Service accounts.
- Message Category - select HR from the dropdown.
- Check the box(es) for Show On Employee Messages Page and/or Show On Company Information Page as appropriate.
- Legal Company Access - Check the box for each entity to which this message should be applied as appropriate.
- Check the Add Document box.
- Attach File - Click the 3 action dots to open your File Explorer.
- Select the file from your File Explorer and click Open.
- File Display Name - Enter the name of the document as you want it displayed to employees (ex., 2026 Employee Handbook).
- Check Requires Acknowledgement box.
- Check the Allow Manager/Supervisor Access boxes if applicable.
- Click Save in the black bar.
On the effective date, the employees' Self Service account Welcome Page will have a "Documents requiring your review" link. The link will direct them to the EMPLOYEE SELF-SERVICE > Employee Messages screen where they can download and electronically sign the document.
NOTE: If you are needing to include multiple documents on a single message, once the Save button is clicked, new tabs will appear above the black bar. Click on the Documents tab, then click "Add New" to attach additional documents (following Steps #10-15 above).

 What Else Should I Know?
-
Once the document has been acknowledged by the employee, the pdf document with the signed Acknowledgement and Receipt page will be stored under EMPLOYEE MANAGEMENT > Human Resources > Employee Documents.
-
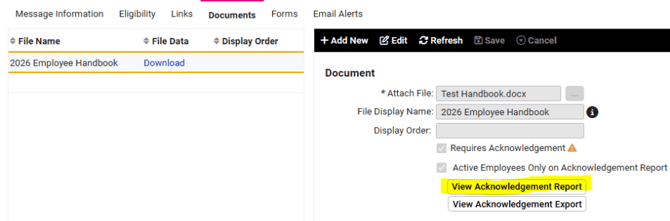
The Acknowledgement Report will show which employees have and have not acknowledged the document. This report is generated from the CLIENT MANAGEMENT > HR Management > HR Administration > Employee Messages screen. Select the message in the list at the top, then click on the Documents tab. Click View Acknowledgement Report. The report will show if the employee has consented to electronic consent in their Self-Service Service account and the date they acknowledged the document.
-
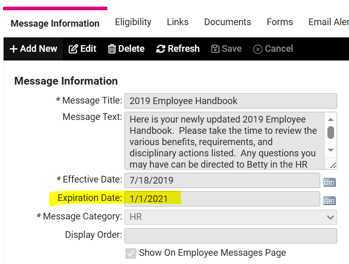
In order to remove a previous message containing old documentation, an Expiration Date must be entered. Any messages containing documents that have been acknowledged cannot be deleted due to the historical records that have been saved.