
Nothing smooths out my brain faster than taxes. After only a few lines of tax mumbo jumbo, the words start to slide off my prefrontal cortex like it was coated in ice. Something about the words “exemptions” and “withholdings” fills me with just the right amount of anxiety to trigger my flight response, and my brain does its best to think about anything else.
Unfortunately, taxes are a necessary part of our lives and as appealing as it is to let them worry about themselves, avoiding them only makes them scarier. The big fear with taxes is hearing that you owe the government extra money come tax season, and the best way to avoid that pain is to learn how to fill out your W4 accurately. Understanding what each part of the form is asking for might sound like a snooze fest, but it's your ticket to avoiding tax season nightmares. So, let's ditch the fear, break it down, and go over how to fill out your W4 together.
The Purpose of a W4
The overall purpose of a W4 is to help the employer calculate an employee’s tax liability for Federal Withholding. When I say Federal Withholding, I mean the amount that comes out of the employee’s check; the larger the wages, the more that is taken from the check. As an employee, this is your chance to plan for what you want to happen come tax season. There are two choices, you can either increase your withholding to plan for a refund come tax season, or you can try to get your withholding to be as accurate as possible. You can reduce your withholding by claiming deductions, credits, and exemptions, however, it is illegal to willfully reduce your withholding beyond what it truly should be. You can increase your withholding by claiming additional income or listing out an additional withholding you would like to add to the per-check calculation. We have a blog that goes more in-depth about per-check calculation here.
Time for a brain break. Close your eyes, take a deep breath, and let it out slowly. Do that one more time before you keep going.
We are going to talk about annual tax calculations now. If you can understand this part, the rest of the W4 will be a total breeze. Unless you choose to itemize your deduction, you start to calculate your tax liability by subtracting the Standard Deduction from your Annual Gross Income. The amount that the Standard Deduction subtracts changes based on your filing status. Here are the 2024 Standard Deduction amounts based on filing status:
- Single or Married Filing Separately - $14,600
- Head of Household - $21,900
- Married Filing Jointly or Qualifying Widow(er) - $29,200
Once you have your Annual Gross Income and have subtracted your standard deduction, you compare that number to the Tax Bracket Table to determine your tax rate (ignore the Amount Owed from Lower Bracket Column for now):
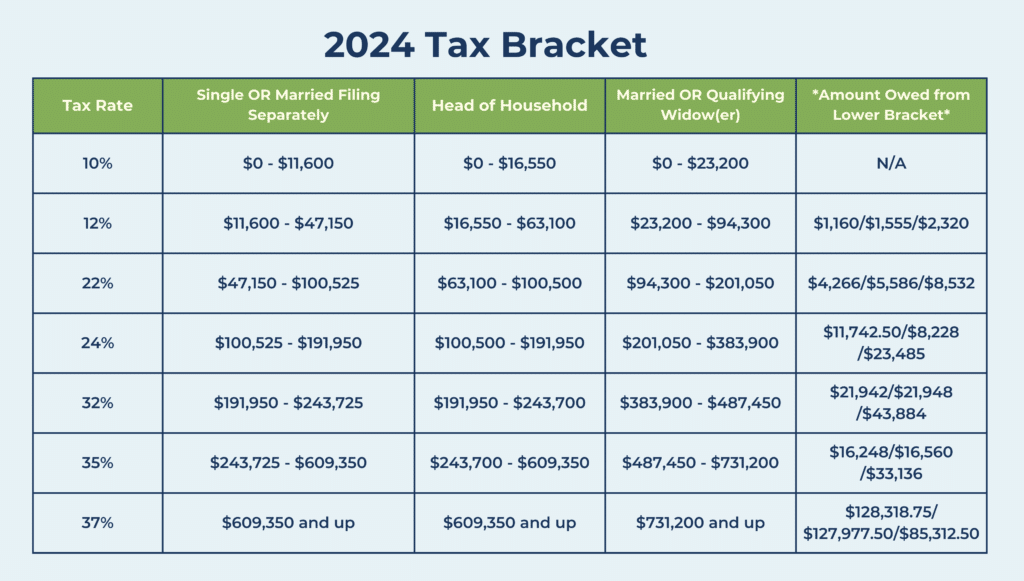
Let’s walk through an example of how to calculate someone’s annual tax liability. Let’s say that our good friend Tony Test has a filing status of Single and has a 2024 total Annual Gross Income of $136,000. When we subtract the standard deduction for a single filer ($14,600), we get $121,400. If it were easy, we would get his tax liability by taking 24% of $121,400 and say Tony owes $29,136. But the IRS has made it difficult, which saves Tony some money, so it’s a complication he is on board with. Tony’s income is segmented and taxed at each rate, meaning his first $11,600 is taxed at 10%, the next $35,550 is taxed at 12%, the next $53,375 is taxed at 22%, and the final $20,875 remaining is taxed at 24%. So, to get Tony’s tax liability, we take 24% of $20,875 ($5,010) and add the Single filer amounts from the *Amount Owed from Lower Bracket* column from the 24% row and each row above it ($5,010 + $11,742.50 + $4,266 + $1,160 = $22,178.50).
It would be a massive hit for Tony to have to pay his entire tax liability all at once, which is why a portion of his liability is taken each time Tony gets paid. The primary purpose of a W4 is to help the employer calculate what that amount should be so that at the end of the tax year Tony doesn’t have to pay anything more. When filling out a W4, the information you provide is used to better estimate what your Annual Gross Income will turn out to be.
The W4 - Field by Field
In 2020, the IRS published a new W4 with a new format that helps employers get even closer to an employee’s Annual Gross Income. Whether you are unfamiliar with the new format or unfamiliar with the form W4 in general, understanding what is being asked for, and what your answers mean is essential. There are not many fields to go through, but let’s get through each section so that you can feel confident signing your name at the bottom.
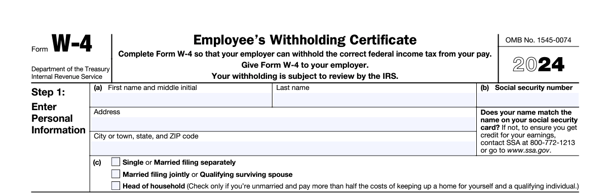
Step 1: Don’t panic. You got this. This information should be second nature. I am sure this will be at least the third time you have filled out most of this information since you started the new hire packet. The BIG decision here is selecting your filing status. The filing status determines the amount of your standard deduction as well as the tax brackets that are used to calculate your liability. For most people, this is a self-explanatory choice, because you can’t choose what you are not. The big question here is “If I am married, why would/should I file separately?” The answer I got when I asked this question was, “If you don’t know why you should file separately, file jointly.” I felt like my questions had been dodged, but the truth was it had just been answered concisely.
In most cases, filing separately is used when one spouse wants to itemize their deduction, has self-employed income, or is trying to separate from their spouse. So, in most cases, if you are not aware of a reason you would want to file separately, there likely isn’t one. At the end of the day, the filing status that you claim does not lock you into the filing status that you file with at the end of the year, so do not fret over this decision.
Once you have that part filled in, you see this disclaimer below:

What this means is that from here on, if a section doesn’t apply to you, leave it blank.
Step 2: Other Jobs. The primary purpose of the W4 is to help the employer get as close as possible to the employee’s tax liability. Your tax liability is based on the entirety of your Annual Gross Income, so if you have other jobs, if your spouse has a job, your employer won’t know to include those amounts in their calculation of your liability, and you will be left owing a lot of money to the government. This is an important step if you have more than one job that is adding to your Annual Gross Income.

The IRS has provided three options for reporting other income. The first option is to use the Tax Withholding Estimator. The estimator takes a bit of time to complete and asks you for a lot more information. It is likely best to only use this option if you or your spouse have self-employed income. The second option is to look at the Multiple Jobs Worksheet which we will look at in more detail at the end of the article because, in typical IRS fashion, the best option is listed last. Option ‘c’ can be used if the two jobs pay similar annual amounts, and similar in this case is “pay at the lower paying job is more than half of the pay at the higher paying job.” If there are only two jobs, and the pay is similar enough, you can check the box and move on.
Step 3: The part that’s different. On the old W4 form you used to claim what was called exemptions. Exemptions were a blanket approach to cover the many kinds of credits you could claim on your tax return. It often resulted in a lot of people getting a tax refund at the end of the year. Well, the IRS instituted a solution that will allow people to get much closer to their number of credits and reduce the amount of refunds that they need to give out.

Instead of multiple exemptions, you now enter a dollar amount of the credits that you plan to claim. Since the most common credit is the Dependent credit, they have provided a space for you to calculate the Dependent credit you want to claim. $2000 for each qualifying child under 17, and $500 for each other dependent. Enter the total dollar amount you want to claim on line 3. By keeping this part accurate you will increase the likelihood that you will not owe or get much back from the government.
Step 4: The step that’s really three different steps. In this part, you have the option to enter any kind of adjustment to your Annual Gross Income or to add dollars to the amount that is withheld each check.

- 4a is the amount of money that you want your employer to add to your Annual Gross Income, particularly from sources that are not taxed. They list examples of interest, dividends, and retirement income. This is another way to help your employer know what else should be included in your tax liability calculation.
- 4b is just the opposite. If you plan to itemize your deduction, you can complete the Deductions Worksheet on page 3 to figure out what to enter there. You can either take the standard deduction or an itemized deduction, so if your itemization is not greater than the standard deduction, you should just take the standard deduction and leave this part blank.
- 4c is where you can enter an amount or percent of your gross income that you would like to be taken in addition to whatever your employer calculates. If you choose to complete the Multiple Jobs Worksheet, you enter your final amount on this line. If you want to make sure that you get a refund from the government at the end of the year, entering an amount in the Extra Withholding line is the best bet for that to happen.
Step 5: The part that leaves you unsure. You’ve done it, sign and date and you are good to go!

That little line of text at the top of the box is what motivates employees to ask questions about what they are unsure of. In general terms, this is confirmation that your employer can use this document to calculate your taxes throughout the year. It also serves to indict people who are knowingly committing tax evasion. If you make a mistake or put down something you change your mind about, there is no problem with filling out a new W4. But now that you have read this guide, you will be able to fill out your W4 with confidence and be able to sign with a smile on your face.
Multiple Jobs Worksheet
If you are still here, it means that you want to know about filling out the Multiple Jobs Worksheet. I didn’t forget about you; I was just waiting for the others to leave. To cover all the possibilities, we are going to run through two examples of needing to fill out the Worksheet. For the first one, we can continue with the example that we used above. Tony Test has an Annual Gross Income of 136,000. Let’s say he has two jobs, one where he earns $94,000 a year as a sales manager, and another where he earns the other $42,000 a year working as a bartender on nights and weekends. The IRS recommends you only complete this Worksheet for the higher paying job, so Tony needs to update his W4 for his sales manager job.

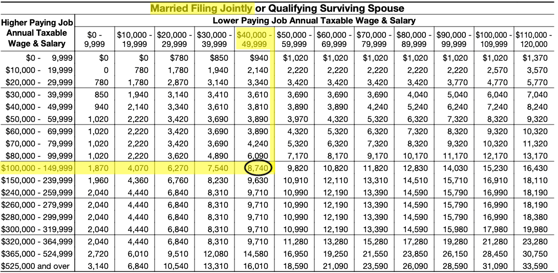
If there are only two jobs ignore everything to do with line 2. Line one has us find the dollar amount that acts as the intersection point between the two jobs’ annual salaries. Tony is filing as single in this example, so look at the table, and find the higher paying salary ($92,00) on the left side, and the lower paying salary ($44,000) on the top. Find the amount where they intersect and put that amount in the box for line 1.

In this example we put the dollar amount of $7,440 in box 1, then we skip to line 3. Now it is asking for us to enter the number of pay periods the higher paying job has. If you aren’t sure, then ask the employer what the pay frequency is and use the number associated with that frequency:
- Weekly – 52
- Biweekly – 26
- Semi-Monthly – 24
- Monthly – 12
For our example, we will say Tony’s higher-paying job as a sales manager pays biweekly. So, we enter 26 in box 3 and move on to line 4. At this point, we divide the dollar amount by the number of pay periods and enter that amount in the Extra Withholding section on page 1. So, in our example, we take $7,460 and divide by 26 to get $286.92. Once we have that entered, we can continue completing the rest of the W4.
For the second scenario, we will say that Tony still has his two jobs, but he is now married to someone who is also working, Tina Test. Tina works as a librarian for $54,000 a year. We are still going to only complete this worksheet on Tony’s sales manager job W4, but now we are skipping line 1 and going to line 2.

Line 2 asks us first to find the intersection between our highest paying job, and our second highest paying job. In this case, we are looking at Tony’s sales manager job and Tina’s Librarian job. Another thing to note is that in this example we are looking at the Married Filing Jointly grid instead of the Single one.

So, in box 2a we write $7,170. The next step is to find the intersection of the sum of the two higher-paying jobs ($92k + $54k = $146k) and the lowest-paying job ($44k).
So, in box 2b we write $8,740. The last step in line two is to add the two amounts we found together ($7,170 + $8,740 = $15,910). Once we have the sum in box 2c, we can complete lines 3 and 4 the same as before ($15,910 / 26 = $611.92). And we can put the result in box 4c on page one.
You’ve Got This!
Taxes and tax forms can feel complicated and intimidating, but with the right guide, you can be confident that you’ll be prepared for your part. At Whirks, we strive to be a resource to both employers and employees for all things business & back-office. If you’re looking to learn more about business best practices, check out The One Step Better Podcast or check out our FREE webinars.